![iFun Screen Recorder Review [2021]](/_next/image/?url=https%3A%2F%2Fwww.explosion.com%2Fwp-content%2Fuploads%2F2021%2F04%2FScreenshot-2021-04-14-at-12.18.38.jpg&w=3840&q=75)
For several purposes, we need to record our PC screen – making tutorials or recording gameplay is the most common thing. So, a screen recorder is a handy tool for professionals and hobbyist users. But there are a plethora of tools available for recording screen on Windows 10. An unbiased review can assist you in selecting the right one. Therefore, we came up with this iFun Screen Recorder review that will help you know all about this online screen recorder.
Introducing iFun Screen Recorder
iFun Screen Recorder is a completely free and simple yet powerful screen recorder with a light built-in video editor. It makes screen recording, screen capture, and video editing easy and straightforward. This screen recorder is available for Microsoft Windows 10/8.1/8/7.
Key Features & Highlights
- Record any selected region on your computer in the high-quality video quickly
- Add webcam overlay to video Support full-screen HD game recording
- There is no time limit for recording and no watermark.
- Provide an easy-to-use screenshot feature.
- A simple video editor for editing captured screens.
- Quick share to YouTube, Facebook, Instagram, Twitch, and other platforms.
How To Record Screen On Windows 10 using iFun Screen Recorder?
You must first install iFun Screen Recorder on your Windows PC. It is free to download and use. It gives you free access to all of its features, allowing you to create the professional video you want.
Here’s a short tutorial on how to record screen on Windows 10 using iFun Screen Recorder:
Step 1. Select the region
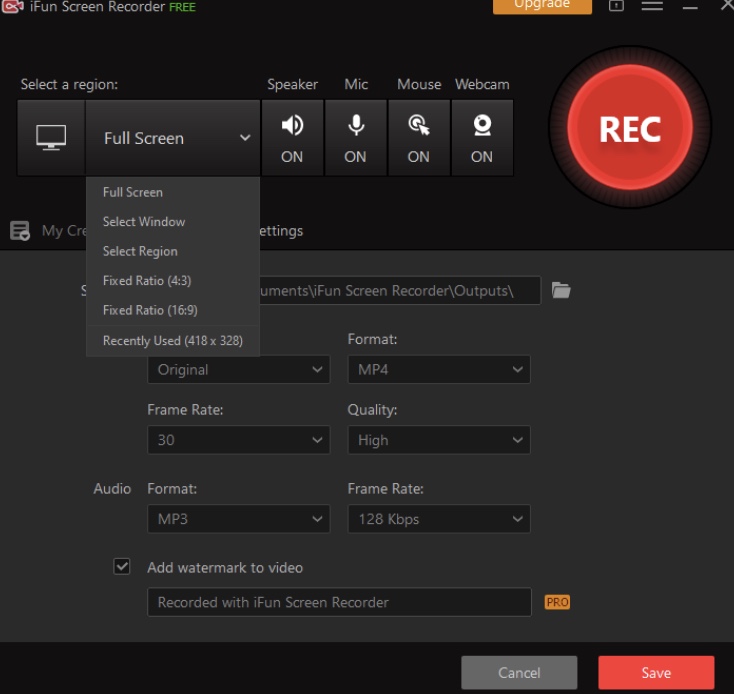
Press the drop-down arrow near the full screen to record the entire screen or pick a region or window to record. It also allows you to record using a fixed ratio or the most recently used recording size.
Step 2. Set the settings for audio, mouse, and webcam
By clicking the On/ Off button for each function in the middle of the main screen, you can easily set whether also to record the Speaker, Microphone, Mouse, and Webcam to your video. If you see N/A next to any settings, it means you don’t have the associated device enabled or linked to your screen.
Step 3. Click REC to Start the Recording
When you press the red REC button, it will begin recording after a 3-second countdown.
Step 4. Click the Done button or press F9 (by default) to complete the recording
When you’re finished recording, you can either click the red Done button in the floating toolbar, as previously stated, or press the default hotkey F9.
Step 5. Video Editing and Sharing
After you’ve finished filming, you can find the recordings in the Videos section of My Creations. When you right-click the recording, you’ll see options like Preview, Edit, Upload, Delete, and Open File Location. When you press Edit, you will be taken to the editing screen shown below. You can then edit your recording as you want and then click on the “Save as” button to save your recordings.
Verdict: Should I Use iFun Screen Recorder?
If you want to record your PC screen or games with audio, we highly suggest iFun Screen Recorder. It’s simple to use that comes with an in-built video editor and has hundreds of export options.
Maya Torres
Maya Torres is the Consumer Tech Editor at Explosion.com with 7 years covering product launches for major technology publications. She has reviewed over 300 devices across smartphones, laptops, wearables, and smart home products. Maya specializes in translating spec sheets into real-world buying advice and attends CES, MWC, and Apple keynotes as press. Her reviews focus on helping readers decide what to buy, not just what specs look good on paper.